Dandelion Hills
  • Blog
  • Sales
    • Chickens
    • Ducks
    • Turkeys
    • Eggs
  • About Us
    • Our Story
    • Contact

Boredom and Sentimentality Lead to Fleece Pajama Rag Quilt

1/26/2015

0 Comments

 
Why am I writing a blog post on our little farm blog about sewing together a rag quilt? Partly because there isn't much else to do in the middle of January, but mostly, it's because I am so stinkin' happy with myself and felt the need to share! I am probably the least crafty person that I know and haven't really sewn anything in my life. The only "sewing" that I have attempted has involved mending a few buttons. Ripped seams, zipper snafus, and the like are sent to my mom. 

Maybe I avoided sewing for so long because my mom was a bit of a sewing expert, and my version of child torture was having to endure hours upon hours of fabric shopping at JoAnn Fabrics. I still feel a bit nauseous just going into that store. But luckily for me, my first sewing project involved piecing together this blanket out of the boys' old fleece pajamas, so I didn't have to set foot in a fabric store.
Picture
Normally I am not a sentimental person. My mom just told me that she will never pass down the special items that she has kept from my own childhood because she fears they will end up at Goodwill or in a garage sale. And she's right. If it has to be stored in a box somewhere and has no real purpose, I won't keep it. 

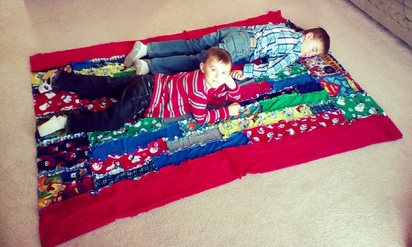
With that said, I always find myself getting sad when I pack away clothes that both boys have outgrown. Especially pajamas. I think the old jammies remind me of reading books before bedtime and early morning snuggles in bed. Plus, every year the boys look forward to getting new Christmas jammies from us and from my parents (which reminds me of this delightful #Xmas Jammies video). So this year I finally decided to gather the old pajamas and assemble them into a blanket, which is sentimental but also useful. I guess it's not really a quilt since no actual quilting was involved. 

The final blanket was completed in three steps. I started out using just the pajama pants. I cut strips out of each leg, and after sewing the front and back part of the pant leg together, I randomly assembled the pieces and sewed the pieces into strips, and then sewed the strips together. That made a nice child-sized blanket, but I wanted it larger, so in a second stage I added 10 rectangular sections from pajama shirts to both ends of the blanket. Once again, I sewed the front and back parts of the shirts together first (thus making the front and the back of the blanket at the same time), and then added those rectangles to the existing blanket. Somehow I got lucky and those pieces that I cut magically fit the existing blanket exactly.

After the 2nd stage, the blanket was plenty long, but not wide enough to comfortably cover me and a child on my lap at the same time, so I added wide strips from an old, unused blanket to both sides.
Picture
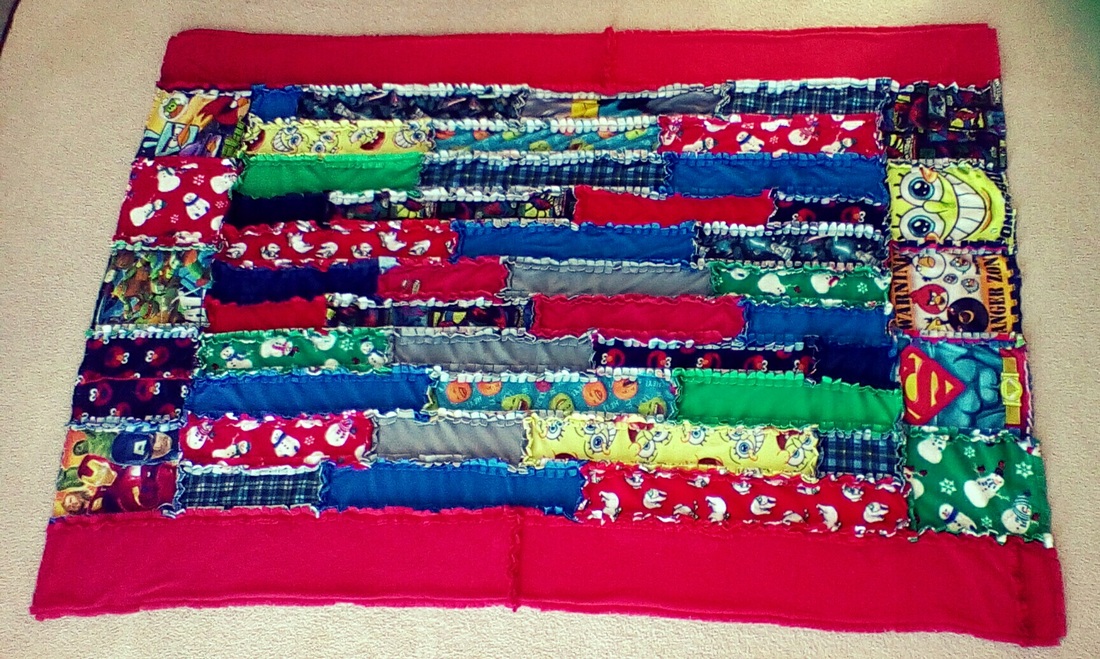
Top side of the blanket with the exposed seams. The worst part of the process was making the hundreds of cuts up and down the seams.
Picture
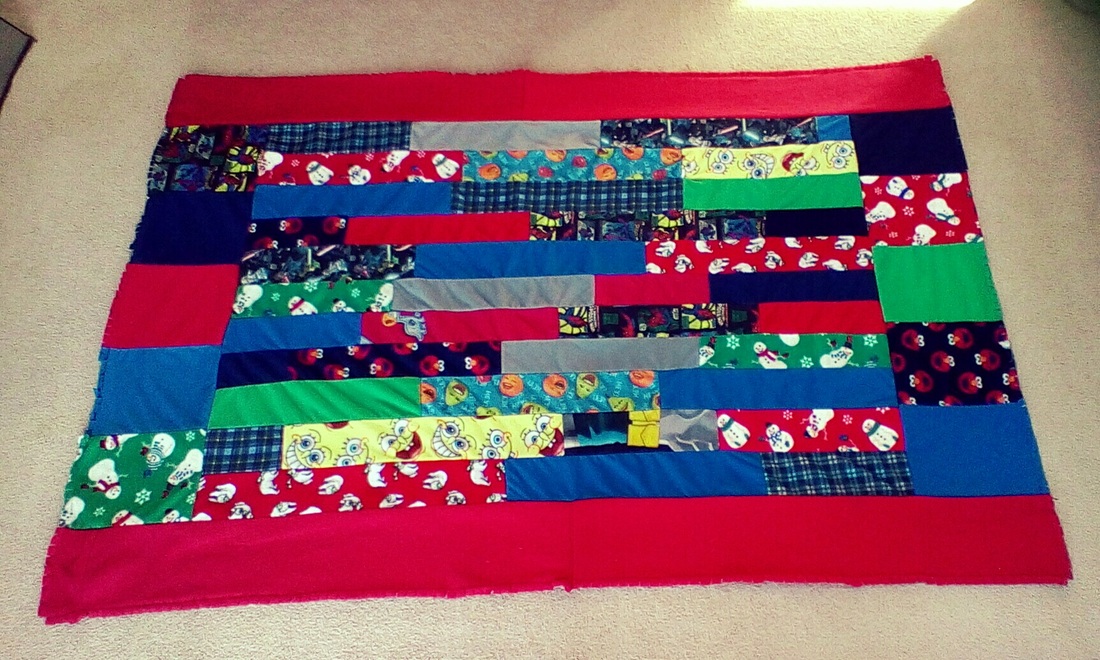
Bottom side of the blanket. No exposed seams.
All in all, it took me four or five afternoons to finish the blanket, and it is large enough to cover a twin bed. The first thing Xander did after seeing the blanket was to find the Spongebob Squarepants panel with a tiny hole in the knee as a result of a flying ember touching those jammies while camping at Silver Lake. That is just one of the many imperfections that make this blanket seem totally perfect to us. Now I am feeling like Spring can wait a bit longer because I am totally excited for my next craft project!

Diana
0 Comments

The Winter Salad Bar: Sprouts and Fodder

1/23/2015

0 Comments

 
Winter provides a multitude of problems with livestock, and the process of "over-wintering" animals requires the expectation that they will "earn their keep" after the winter season has passed. With egg-laying chickens, this is expected, which is why we chose to over-winter. However, they lose their ability to forage for fresh greens and bugs, which leads them to be totally reliant on what we bring to them in the winter coop.
While we love our feed (locally grown and organic), we like to include variety and offering green options will help to keep the nutritional value of the eggs up in the stratosphere of goodness. Therefore, one has to grow the greens for them. (Editor's Obvious Note: Michigan winters are not a good time to grow greens outside for a variety of reasons.  Unless you have a cold frame - FUTURE PROJECT!).  

The best way to grow greens quickly is with a sprouting fodder system; however, we are just shy from being able to afford one of these. In case you were wondering, "just shy" means we are nowhere close to be able or willing to buy this.

As usual, just add good ole' fashion ingenuity--and a father who has a bunch of junk lying around.

The main factors for a fodder system are to have something that holds seeds, is slanted to direct water, and has holes to release water, as well as options to have multiple days of growth (5-8 days depending on what quality of fodder you desire).
My materials included the following: salvaged Christmas tree bowls (don't ask), a permanent marker, an awl, and an old shelf that was originally used to hold merchandise in a store and was provided by the distributor--so we didn't directly pay for it!  Other materials included my stove, tin snips, and 1" x 1" pieces of wood and pine strapping (about 1/2" in thickness).

I heated the awl and used that to put in three holes in one side of the bowl.  I marked this area with the marker to keep track of the drip zone. I then added the strips of wood in order to have a "Rube Goldberg" type of water path system. Side view below.

Picture
It's more visible in the pic below, but I used the tin snips to cut out part of the metal shelf to help encourage pure dripping to the bowl below.
Picture
Then I just alternated the flow down the shelf for a total of six days worth of growth. There were five days on the shelf as the bottom bowls are catchment bowls for the system water. The sixth day is actually the first day of the process--soaking the dry seeds to help induce germination. The last picture shows the current status of this project. I put the shelf up on cinder blocks to get a seventh day of growth (one day soak, six days growing) and have added a fluorescent light in front to get the sprouts green. Without this light, the sprouts and fodder did not photosynthesize. While still nutritious, they lacked some nutrition (chlorophyll) that helps turn our farm-fresh egg yolks that deep orange color.

We started off with rye seed, red and white wheat, barley, and sunflower seeds. The rye and sunflower seeds did pretty well, but I think the sunflower seeds needed another day. Wheat was not good--poor germination, which led to a stinky mess.  Barley is the champ!  
This is great since it is one of the most preferred fodders for livestock. Unfortunately, though, we have been unable to find a source for organic barley seed, but we are happy to know that barley is not grown with genetically-modified seeds. Future test trials will be done using organic black beans and organic spelt from Findlay Organics.

So what are the benefits?
1. Chickens love it!
2. We love the eggs!  They are noticeably different and those yolks have regained  their "orangeness."
3. We are taking 12 oz. of feed every day and turning it into 48 oz. of fodder, with our best day producing six times more feed than we initially started.  Obviously, this can save money in feed costs.
4. It is much healthier for the chickens.
5. It keeps me busy and is nice to grow things in the winter.

What are the problems?
1. Ideally we should be multiplying food by six times, not four.  There is still more work to do to fine tune the system.
2. The seeds may not be getting watered often enough.
3. Humidity is important and it is low in our furnace-heated house.
4. Some of the levels are off on the shelves. If you look at the picture the shelves with 1" x 1" transitioning to the pine strapping have a better angle than the 1" x 1" to shelf angle. I think this may be causing water to go too fast through those.
5. This will not produce enough fodder for future animals.

So while we reap the benefits, it is back to the drawing board to try to increase the scale and efficiency.

We will likely implement the system below in the summer due to its simplicity. Give it a look, it's pretty simple.
Total Cost: Donated shelf, donated bowls, donated wood, zip strips (already had), cinder blocks (already had).  While I can't say free, I didn't spend anything to make it.

Trevor
0 Comments

Oh Lard

1/20/2015

0 Comments

 
Picture
Picture
We were afraid that lard-rendering was a difficult process, but really it was quite simple. First, we sliced up the raw lard. Everything we read said it should be cut into tiny chunks or even grated, but we were lazy and decided to see if the slices would work. (It seemed to work just fine.) We also removed any wonky bits - veins and bits of flesh and sinew - and fed those to the chickens.

Clearly, our family does not eat a perfect diet, but we are trying . . . slower than we would like however. Step one was to preserve as many veggies as possible in our own garden. Step two was raising our own chickens for eggs and meat and finding a source for local, organic, grass-fed beef (we bought 1/2 a steer). Step three is more ambiguous--just trying to make better choices at the grocery store by buying more "whole" foods and avoiding as many packaged foods and GMOs as possible.

There is one item that has been on "death row" in regards to being removed from our pantry: "vegetable" shortening. I had to put the word "vegetable" in quotations because really, vegetables aren't used to make shortening. I knew that vegetable shortening was highly processed, likely contained GMOs and chemicals, and was full of hydrogenated fats, but butter just wasn't a legitimate substitute for shortening to get flaky pie crusts. 

Enter, lard. I know that lard is making a comeback, but we have taken a long time to jump on the lard bandwagon. Just the word "lard" is disgusting. Tub of lard. Lard-ass. Heck, it makes Trevor think of the dude from the queasy-inducing pie eating contest in the movie "Stand By Me."

We decided to hail that bandwagon and give it a try. We purchased 10 pounds of leaf lard from a local butcher (leaf lard is mild-flavored and comes from the kidney region of the pig). In the future, we will be sure to obtain lard, and ideally pork, from humanely-raised, pastured pigs.  While I wish that we were doing this ourselves starting yesterday, we may have to explore other options, such as Peter's Heritage Acres.
Picture
Then we cooked it slowly over low heat, stirring often.
Picture

 About 3 hours later, the cracklings were brown and crispy-ish and floated to the top, so we turned the heat off and strained the lard and poured it into jars. 

Picture
The 10 pounds of raw lard transformed into just over a gallon of rendered lard + more cracklings than I know what to do with. I lightly salted the cracklings and fed them to the kids, and got mixed reviews. Max didn't really like them, but Xander did. He said they "smelled like chicken, but tasted a bit like bacon." I couldn't bring myself to try them--I guess I'm not quite that evolved. I may crumble them up a bit and use them as a crispy topping for a casserole, but in the worst case scenario they will be a fatty chicken treat.
Picture
Picture
As a recovering vegetarian, this entire process pretty much grossed me out--from handling the slabs of pig fat, to the mild pork aroma permeating throughout the house, to watching my children chewing on crispy pork fat. However, the rendered lard is clean and beautiful and was the perfect oil for scrambling eggs this morning. I can't say that I am looking forward to rendering lard again in the future, but it doesn't freak me out anymore.  So I guess that's progress.

Diana

Picture
Thanks for the photo, Peter's Heritage Acres
ADDITIONAL LARD READING:
"If Vegetables Don't Make Oil, What Is Crisco?

"Who Killed Lard?"
0 Comments

So How Are The Chickens Doing?

1/18/2015

1 Comment

 
Great question, thanks for asking. Recently we had some very chilly nights, but all of our research said to stay away from heat lamps to decrease dependency of the hens on that added heat. As you may remember, the hens spent the summer in the pen shown below. We had an electronet fence around this rolling coop all summer to keep them from roaming. A few clipped wings and getting into the habit of letting the hens out about 60-90 minutes before dusk to roam and forage helped them stay put throughout the day as well.

Picture
However, this was not going to be the winter option and as the shed was being built, it was necessary to come up with a winter coop solution.  I wanted to build one out of pallets, but other building projects took time away from that option.  So we decided to go with a carport from Harbor Freight.

Picture
We staked it down really well with additional stakes so that it could handle a bit more wind. It is of note, that the carport was not recommended for high winds and snow. So we did our best and hoped for the best. It was placed in front of the new shed to help block the direct north wind. We put a fifty foot roll of six-foot fence from the middle of the front to the back left corner to provide a run. After this, we dumped all of our garden waste in there for them to pick through until freeze. Now, the stainless steel feed cans are near the front middle of the door blocking that area so the hens cannot get out. The right zipper is how we get in and the left zipper is the entrance into the run. We keep that open during the day and clamp it on the fence. In the upper middle of the carport is what looks like a port hole on a boat.

Picture
Chickens need ventilation in their coop so we cut a hole in the tarp and placed a piece of old screen there. The rim is a bucket top with the center cut out.  There is another inside and we screwed those together to sandwich the screen in place. We only did one and it was pretty good. We are ready to add another if the ventilation is not good enough, which would be apparent by the fumes in the coop, condensation on the inside of the tarp and/or or frost.

Picture
This is the inside looking toward the back. Since the carport is not snow rated, we have a handy broom in there, but also built some braces just in case. These doubled as a place to put extra roosts. These are the primary roosts and have about 16-17 of the hens and Charlie the rooster on them each night. The back is a steel frame that my dad gave us and is used to hold some 2x4s for back roosts. We have a healthy amount of straw as a base and keep adding more straw or pine shavings to it every week or so. The black tarp on the sides, and white tarp on the back is discarded lumber tarp I salvaged from the dumpster at a lumber yard. This is relatively windproof and was used to block drafts from under the carport. The netting on the back is actually poly-fence and is just there to stop chickens from falling behind and getting trapped between the two levels.

Picture
This is the back looking forward. These were our bucket nesting boxes, which they don't use. They did initially, but they found a better place and so we let them lay there instead. Occasionally, there is an egg in these. We think it is when "Mama" the black sex-link hen is sitting on eggs and won't let anyone else in the nesting spot. We aren't letting her go broody just yet, but we will let her in the spring if she is still interested. That could be really cool. There are straw bales in front of the door for draft protection too. We covered them in lumber tarps to stop the chickens from tearing them apart.

Overall, we are very happy with our winter coop solution. It gets cold in there, but we haven't lost any hens yet and have not added any additional heating. It warms up during the day (earlier today it was at 43 degrees) and then cools off at night. They don't go in the run much anymore so we have moved their food and water into the coop. There is generally no odor, and if there is, we add more litter and it improves right away. The extra carbon from the wood shavings and straw help to mediate the odor. We lose a few eggs to freezing, but "Mama" is our savior there as she is often keeping them warm for us until we collect them. We can't complain, as we are getting 10-15 eggs a day still from 26 hens in the middle of winter--with no supplemental heat or lighting. Not too shabby!.

If you are interested in eggs, just give us a call or contact us via email.  We sell our "beyond-organic" eggs for $4 a dozen and if you prebuy five dozen ($20) we'll throw in an extra half dozen or so.  If you do this, just let us know when you want some and we'll get them ready for you.

Picture
Look forward to a future post in which I demonstrate how our hens are getting fresh green sprouts in the dead of winter. Let's say that it instantly made a huge difference in the egg quality.

Trevor
1 Comment

Who Would Have Thought that The Face Of Mark Bernstein Would Be So Helpful

1/12/2015

0 Comments

 
Most of you should know who Mark Bernstein is. If not, he is the son of the super-lawyer Sam Bernstein and is all over television during a Detroit Tigers game.  How was his face so helpful to Dandelion Hills?  You shall see!
Picture
This is the backyard garden. Our hope was to utilize the area in 2014, but that proved not to be possible. Even though we broke up the ground with a Harley/box rake last fall, the ground was unmanageable even in the wettest part of the spring. The reason . . . clay! The soil on our two acres has turned to compacted clay following its previous years of heavy farming and then several years of neglect. While weeds are slowly working to improve the soil, we would like to expedite the process. First, we sowed a number of helpful plants including different clover varieties, field peas, mangels, and daikon radishes (soil-busters). We then covered the entire area with a healthy blanket of organic hardwood mulch, which we acquired from some guy we know. As the clover and peas began flourishing, we ran our young laying hens through here. The only problem resulted from the fact that the foliage was so thick that it hid the first eggs from our layers, since the silly chickens would rather lay in a natural setting instead of our makeshift nesting box.

That is how we left it for most of the summer. Then in the fall it was time to cover the area. This follows the methods of Jean Martin Fortier and his wife, as laid out in their book "The Market Gardener." This is a very interesting and easy read on how to set up some systems in your backyard to improve production. He believes that soil should be covered in the winter to protect it from erosion and to help improve breakdown of organic matter underneath. This will draw in worms and other creatures you desire to help your soil. He uses silage tarps, found on most farm product websites, but I kept delaying on purchasing the stuff as I wondered if there was a better option. Then I came across . . . old billboards.

In my research online, I stumbled across the idea to use old billboard vinyls as a ground cover. They used to be free to whomever wanted to take them once "expired," but this is not the case anymore. I found 14' by 48' vinyls for $50 from a local advertiser. (The picture above has five of them laid out on our plot.) As many of you have now guessed, one of these vinyls may or may not have Mark Bernstein for University of Michigan Regent on it. Thanks for your face Mark! He is face-first into our dirt and organic matter as the key part of these vinyls is on the backside.

These vinyls have the desired advertising on one side, but the backside is black vinyl. In the spring, this black will absorb the sun and heat up the soil underneath to temperatures that will notify all seeds that it is time to germinate. Since we haven't planted anything, we will refer to most of these germinating plants as undesirables. After doing so, they will break through and meet the vinyl. The lack of sunlight will lead to them dying out since the vinyls will not be removed for quite some time. With most undesirable seeds germinated, than one big problem is gone! When the vinyls are removed, we hope that the soil will be much more workable, lacking weeds and ready for production. Fingers Crossed.  

If I could go back, I would have primed the soil underneath with soil amendments to encourage breakdown and add to the soil. Items such as additional organic material (i.e. leaves, straw, manure), coupled with molasses and/or other amendments (you can even use milk!) would have only added to the soil bounty in the spring.


We are hoping to divide this plot up into ten sections and run a mini-Market Gardener plan on this plot. Fortier has ten rotating plots that are the size of ours, so we will use our one plot and divide into ten areas. If all goes well, we will look at adding another plot.

- Trevor
0 Comments

Around the Farm

1/2/2015

0 Comments

 
Here are some random things that have occurred around the farm since the fall update:
Picture
Picture
The eventual back garden, which we will use for most of our annual production, covered with tarps for the winter. Check back for a future post that explains why we are doing this!

The bees are tucked in for the winter. We have our fingers crossed that they will survive since we had so much fun with them this year. What you see is old lumber tarps from a local lumber yard wrapped around steel t-posts with the black side out. The hope is that the tarp will provide wind protection and the black will absorb heat and create a warm pocket for them. The open side is the south side, which is where the sun will be shining from . . . when it is shining.

Picture
Ya for eggs! Production has increased and despite lack of sun and cold temperatures, we will get up to ten or twelve eggs a day; however, this was only after we found their hiding spot. We thought five eggs a day was what we were going to get, until we determined the sneaky hens had a secret stash. We missed a grand total of 39 eggs before we caught on. Needless to say, the dog and new kitty are happy we missed them as we cook the eggs up and off them as a treat every other day or so.

Picture
The new shed was finally finished. Huge thanks to my father and father-in-law for their help. Look forward to a post on this shed where I breakdown why it looks like a baseball field press box and some of the materials we used. We still are missing the double doors, but it's tarped off for the winter . . . and already full!

Picture
The Winter Coop.  Another post will explain what we did here, but we had to have a winter housing option for the hens and this is the direction we went. It is actually a carport with a ventilation hole in the top. The future post will show you the inner confines of this hen sanctuary.

Picture
This is a fodder system for turning dry seed into sprouts for the chickens. In the winter they do not get much fresh food from foraging so we are setting out to make it for them. In doing so, we also hope to save on some feed costs as sprouting seeds can turn one pounds of seed into 5-6 pounds of feed. While still a work in progress, we have successfully increased the yield by at least double. More fine tuning should get us closer to the desirable mark of 4-5 times more feed. The fodder system also greatly increases the nutritional value (vs. feeding seeds) for the chickens. A future post will explain how this came together for ZERO DOLLARS!

More to Come!

Trevor
0 Comments
    Picture

    ABOUT

    Dandelion Hills is a family-owned farm in Caro, Michigan, established to provide beyond-organic food to its owners and the local community while improving the soil quality.

    Categories

    All
    Bees
    Chickens
    Continuing Ed.
    DIY
    Ducks
    Food
    Gardening
    Geese
    Homesteading Tips
    Maple Syrup
    Our Stories
    Preserving Food
    Quail
    Trees
    Turkeys
    Weeds

    Dandelion Hills

    Archives

    May 2016
    February 2016
    January 2016
    July 2015
    June 2015
    May 2015
    February 2015
    January 2015
    December 2014
    September 2014
    July 2014
    June 2014
    May 2014
    April 2014
    March 2014

    TAGS

    Dandelions Hills Farm Caro Michigan Local Permaculture Sustainable Ecological Natural Beyond Organic Biodiiversity Regenerative Family Farm Mini-farm Farmstead Homestead Pastured Eggs Chicks Chickens Poultry Gardening Honey Bees Flowers Herbs Ducks Turkeys Geese Quail Market Garden
Powered by Create your own unique website with customizable templates.