One of the cooler things we have come across in our homesteading adventures is hand-held vacuum sealing. The current process for vacuum sealing usually involves a Food Saver or similar appliance. Almost all of these run on electricity and require plastic bags that are only single use. Pretty wasteful, but still good for keeping food fresh. However, this can be done with a reusable container and no electricity. The following video demonstrates our hand-held vacuum sealer as I use it to marinate jerky:
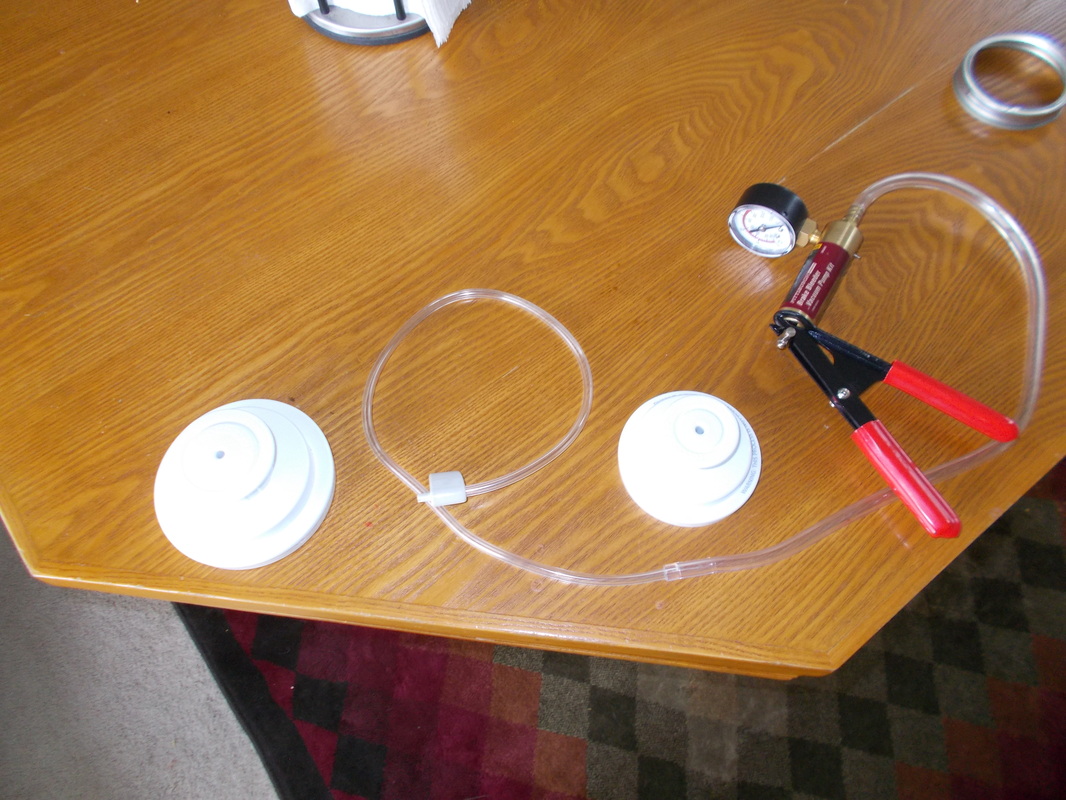
We found the idea on Youtube and while I explain it in the video, the necessary items are canning jars and lids as your reusable containers, a hand-held brake bleeder, Food Saver jar sealer attachments, and a Food Saver Accessory Hose. While these links direct you to the Food Saver site, go to eBay and buy a kit that has the regular mouth and wide mouth attachments and the accessory hose. We would have saved $5-$10 doing this. We bought the brake bleeder from Harbor Freight and I think we paid $25 for it. For the sake of saying it, I do think a new, in-package brake bleeder would be a good idea here. Don't go digging in the toolbox for the greasy grimy one you used last year.
After getting it, I attached the hose that came with the brake bleeder and then cut off an end of the Food Saver Accessory Hose. This cut end fit perfectly in the clear hose that came with the brake bleeder--no sealing necessary. If you do this, I hope it fits great for you too.
After getting it, I attached the hose that came with the brake bleeder and then cut off an end of the Food Saver Accessory Hose. This cut end fit perfectly in the clear hose that came with the brake bleeder--no sealing necessary. If you do this, I hope it fits great for you too.
Notice that there are no bands on the sealed jars that I am holding in the last three pictures. For the Hershey bars or any already-wrapped packages, you will need to poke a hole in the wrapper. They are already sealed and that air will stay in there unless you poke that hole.
This video demonstrates how crunchy the cereal is after being stored for over ten months in the vacuum-sealed jar. For some reason the kids were happy to help with this video.
This video demonstrates how crunchy the cereal is after being stored for over ten months in the vacuum-sealed jar. For some reason the kids were happy to help with this video.
If you have good canning jars with no cracks you can pressurize up to 20 PSI per my research. We try to shoot for over 15 PSI at least. This will be easier and harder based upon what is in it. A jar of herbs will be almost all air so that will take longer than the same jar full of rice. By harder I mean more elbow and wrist grease to squeeze the brake bleeder. Good exercise!
Words of warning. The brake bleeder is not meant for this purpose so please use at your own risk. Some people have been concerned about the brass fittings at the end of the brake bleeder. Our logic is that the brake bleeder is only pulling the air out of the jars and not putting any air into it, so there should be no brass residue. Anyway, we are okay with it.
Also, please research what foods to use. Powders can be used (e.g. flour, dry milk), but keep the level lower in the jar so as not to suck up the powder in the hose. Use only dried materials. Even though the air is out, if there is water in the jar it will still work to cause food to spoil. Also, leave your recently-sealed jars close by for a week or so and check the seals. After a week, if it is still sealed, it will likely remain sealed. No promises though! Some theories state that if you seal it well, it should stay good for a very long time, perhaps 5+ years as long as that lid is safely sealed on there.
If there is a leak, the pressure will equalize and loosen the lid on the jar, so if the lid is solidly attached, then the jar is still sealed as the day you did it.
In regards to wasting, another great thing is finding a use for "spent" canning lids. Since water bath and pressure cooker canning require tight seals, it is always recommended that you use new, unused lids. For this process, as long as the lid is not bent and the seal is in good shape, it should work. It's not using heat to melt the seal around the lid, it's sucking the lid onto the jar and this allows you to use "spent" lids as opposed to throwing them out.
Finally, in case you are new to the world of food preservation and think that vacuum sealing is a substitute for water-bath canning or pressure canning, you are mistaken! Those foods need to be properly sealed through the appropriate canning method--not through the use of a vacuum sealer.
The only downside to this process is that the jars can be expensive. However, just buy all the ones you can find at garage sales (just not the ones we are going to) and start stocking up. Canning jars are invaluable items. Great for storage and canning (obviously), but can be used for any number of other uses, decorations and even for bee hives! Email us if you need more information on this handy, no waste, electricity-free food storage device.
- Trevor