As we endeavored on this farm, one of our goals was to utilize scraps and repurpose random things into the items that we needed. This hasn't always been the case as some things were needed "right now" and a trip to TSC worked better than trying to build chick feeders at that particular time. However, looking around there are a number of interesting builds on the property that have come at almost no cost, minimal cost, or at a cost far less than what one could have purchased the originals. Perhaps some of this post is pride, but also a chance to help others move past their commercial addictions and use their creativity to "MacGyver" things with the items one has at hand. When you succeed, its quite a sense of accomplishment.
Bee projects were a combination of scrap and new melded together in a good way. Hives built by myself and my dad this winter. Bee feeder thrown together with scrap by me. Tables by me. Overall, not bad considering bee feeders are $25 and top bar bee hives are much much more! We love Christy's bees, but we can build the rest!
The above pics are associated with the chicken tractor and the hens/pullets. A lot of new, but a lot of repurposed and invented things. Chicken tractor is mostly based upon the plans of Harvey Ussery. With the brooder, we also repurposed a broken baby gate for a lid and the other lid was a divider from a dog kennel. Not pictured, but I just made a chicken feeder with a "found" bucket that I drilled holes in the bottom and then glued that to the bottom of a cheap laundry basket with the top 3/4 cut off. It looks similar to this, just without a garbage bucket, but a standard five gallon bucket.
More chicken stuff thrown together at the last minute . . . the best way!
Broiler pen and accessories. Pen frame was all new, treated wood and new screws. Some pics of construction. Most of it was 1" 2x6s that were ripped. Found some plans online for Salatin-style pens and made it 6' x 12' instead of 10' x 12'. Framing was pretty much to plan. Chicken wire was scraps and a roll found in under the work bench at my dads. Steel was leftover from a building and was free! Used leftover screws to connect it together, so that was good. I have this pickle jar full of extra screws that finally came in handy. Small changes is the framing under the door for stability and added another stabilizer beam on the back to make the steel sturdier. Salatin-style pens sit flush on the ground and require a dolly to move. These are often made of steel tubing like this. While I'm sure his is very sturdy, why not repurpose a seed rack. HUH? Well, we took a leftover seed rack, cut off one set of legs on back, found a steel rod that went through some old lawnmower deck wheels and wired that on for now. Then, we smashed the remaining feet flat for ease of sliding and added buffers to keep the pen off the wheels. Frankly, we didn't think it would be sturdy enough. WRONG! It works like a charm. This was definitely a Trent Grice creation. The last pic is our broiler feeder. We cut some scrap tile and nailed it to a leftover, weathered deck board, added scrap for a handle. It needs stabilizer feet, which I was going to do before my foot exploded. However, what do you use for end caps? Why empty worm dishes of course. They fit perfectly in the tile and slid nicely into the groove. This a cool build for sure.
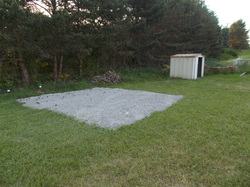
This looks like a pile of rocks, which it is. However, I'm excited for this one. This is the foundation for our future shed. The stones are the limestone strippings from my father-in-law's driveway after he had it flattened in preparation for his asphalt driveway. I also got three other loads on my driveway to help some trouble spots. While this is cool, I'm more excited for the shed that will be built. Walls are expected to be old plant display tables, siding will be leftover steel siding/roofing, base beams are treated 4x6's that are laying around my dad's place. We will try to use other "found" stuff as well as we search for leftover windows, doors, etc. The plans are in my head, but hopefully on this foundation by the end of the year. The shed in the back was just saved from my brother-in-law's place as he almost tore it apart for scrap. Not sure what we'll do with it yet, but it's still good and sturdy. I guess it's like 40 years old. It was pretty easy getting it on the trailer. I sat in the hammock and watched my dad and brother-in-law do it. I had to keep my foot up. What did it cost? Sounds like it may cost us some chickens.
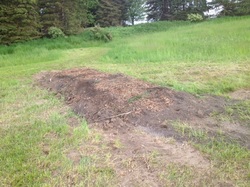
I have a post on the "hugel" mound, but this is also one of the cool builds on the property. I was going to dig this by hand, so I'm glad I used the tractor when it was here. The woody material is brush and tree branches we had for free. Top soil was originally in the previous owner's raised bed garden that I forgot about and the mulch top layer is free wood chips from tree trimmers.
While this is a small breakdown of some of the stuff that we are doing on the farm, I also shared this to show that if you look around, most anybody can get started on projects. We don't need to go and buy everything. Sure, not everybody has a bunch of tools or woodworking know how, but the worst thing you can do is not try to build it. You learn a lot during the process. I look forward to "MacGyvering" more stuff as we go along
- Trevor
- Trevor